

*This post may contain affiliate links. That means I may earn a small commission from qualifying purchases or sign-ups at certainly no additional cost to you! Thanks!*
Want to claim your website on Pinterest but are confused about where to put these codes?
Indeed, claiming your website on Pinterest means you have to add a few scripts or codes to your website.
Pinterest provides 3 ways to do it:
- Add HTML Tag on the <head> section of your website
- Upload HTML Tag on your website’s root directory
- Add TXT record to your domain host
But not everyone has the patience to navigate their WordPress dashboard to tinker with scripts or deal with the confusing File Manager on their web host provider — especially when you’re not the techie type!
Thankfully, there’s an absolutely easier way to do it!
Why Should You Claim Website on Pinterest?
What does “claim website” mean on Pinterest?
Once you claim your website on Pinterest, you will gain access to a pin’s analytic data whenever you publish them on your site, or a pinner pins a page from your website. Your domain name will also be linked and displayed at the top of your Pinterest profile which helps pinners learn more about the business they’re following.
Ready to claim your website and further your website’s reach? Let’s start.
How to Claim Website on Pinterest without Codes
Step 1: Install YOAST SEO Plugin
- On your WordPress dashboard, go to Plugins > click Add New
- Search “Yoast SEO”.
- Install and Activate the plugin.

Step 2: Go to Claimed Accounts Tab
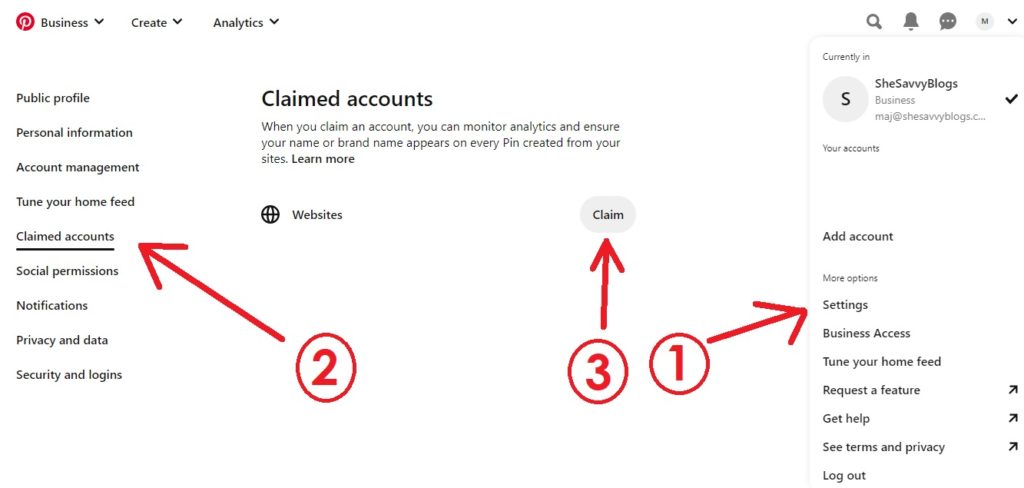
- On your Pinterest account, click the drop-down arrow located at the top-right part of the screen.
- Click on Settings.
- Go to the “Claimed accounts” Tab
- Click “Claim”.
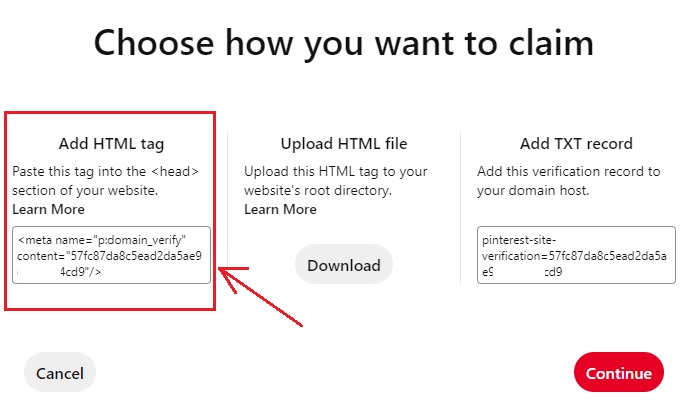
Step 3: Under the “Add HTML tag”, copy the meta tag.
- HTML tags will appear after clicking “Claim”.
- In this tutorial, we’ll use the “Add HTML Tag.” Copy the meta tag and proceed to your WordPress dashboard.
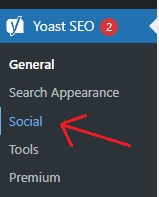
Step 4: Go To Yoast Social and Enable “Open Graph Meta Data”
- On your WordPress dashboard, hover on Yoast SEO and click Social.
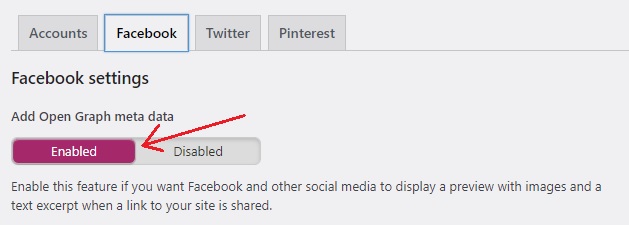
- Go to Facebook Tab.
- Make sure to Enable the Open Graph meta data.
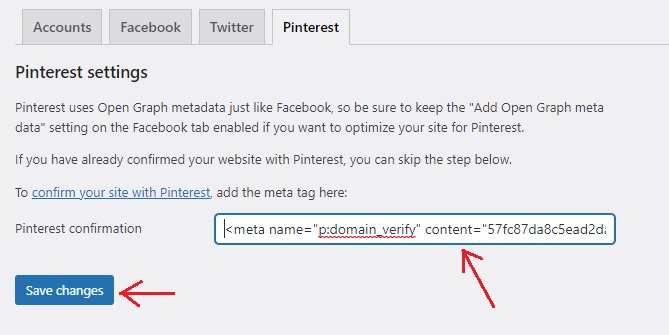
Step 5: Go to Pinterest Tab and Paste the meta tag.
- Still under Yoast Socials, go to Pinterest Tab.
- Paste the meta tag on the box.
- Click Save changes.
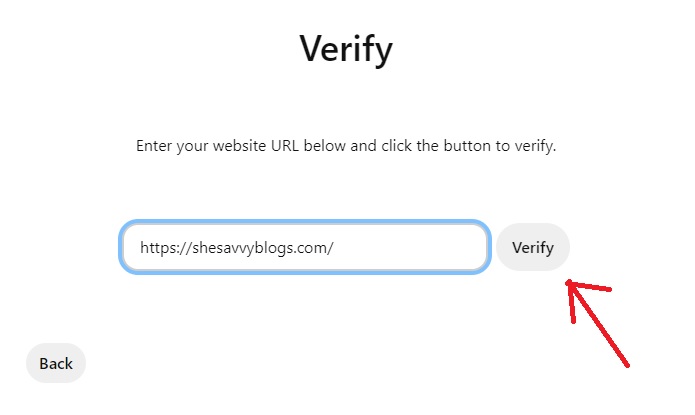
Step 6: Verify your website on Pinterest
- Go back to your Pinterest account and click Continue.
- Verify your website by putting your complete website address.
- Click Verify.
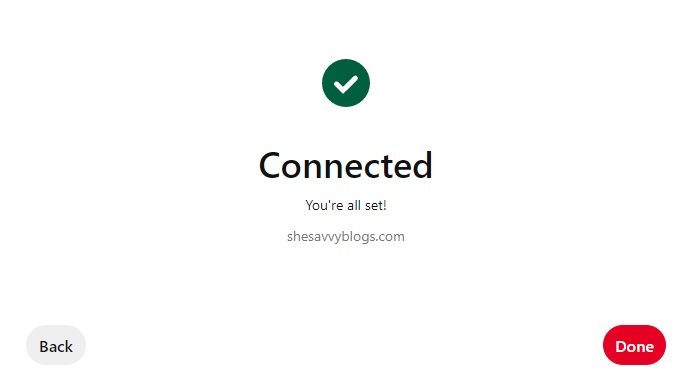
- After a few seconds, Pinterest displays a confirmation that you’re Connected.
Step 7: Go to your Pinterest profile and look for the globe with a checkmark.
- Go to your Pinterest Profile and Refresh.
- You should see your domain name along with a globe with a checkmark beside it.

That’s it! You already claimed your website on your Pinterest account.
You can now get access to your pin’s analytics data when someone engages with it through your website! A link to your website helps promote your website, too!
You may be interested:
BLOGGING RESOURCES I RECOMMEND:
Grammarly – Detects misspelled words and grammatical errors. It gives your piece an overall performance score based on correctness, clarity, engagement, and the delivery of your blog. All free!
Ezoic – Aside from ad monetization, Ezoic also offers SEO, Analytics, and Site Speed tools. With Ezoic, my ad revenue increased 23x more than Google Adsense. Thankfully, they now offer an Access Now Program that accepts new blog websites with a minimum of zero – again – zero traffic!
Canva offers enormous image editing services even as a free platform. I’ve used it since 2018 to create attractive visuals for my Pinterest pins and blog images. Their constantly improving services continue to live up to every blogger’s needs and expectations!